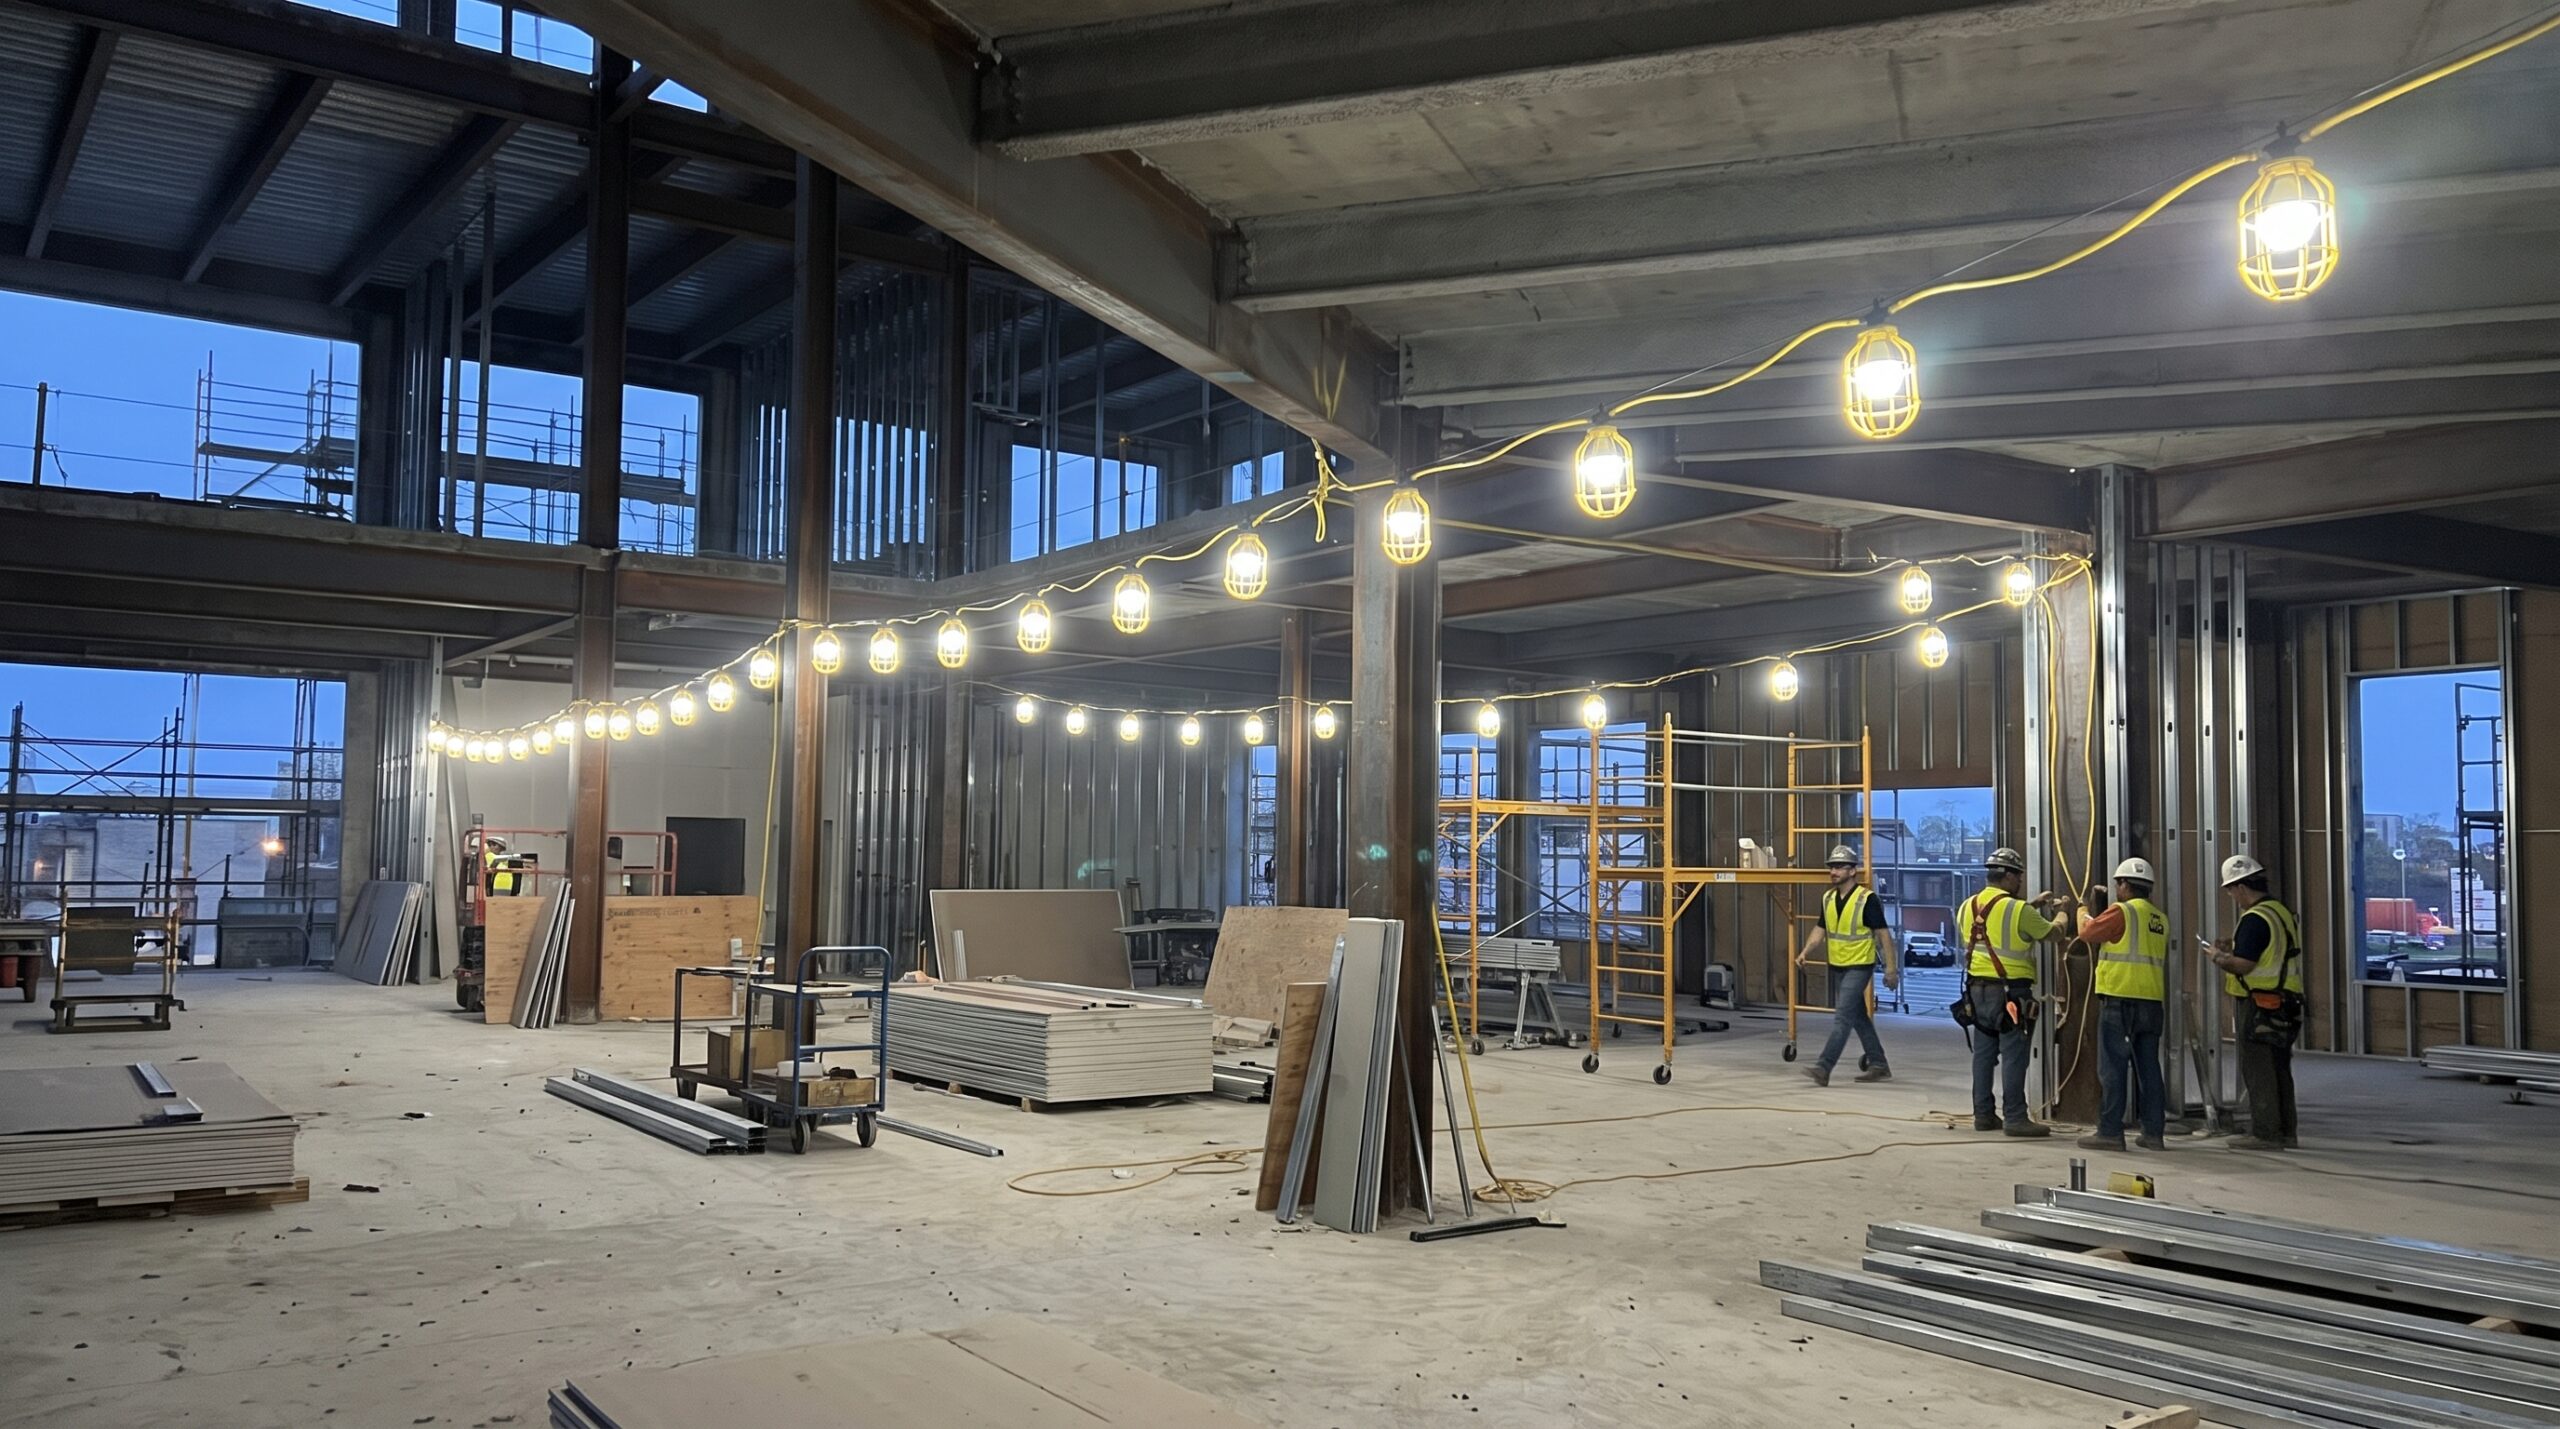
Temporary LED String Lights for Construction Sites: Setup and Coverage
The first temp lighting job I ran as a journeyman was a three story wood frame apartment building in late November, years before LED construction string lights showed up on supply house shelves. The general contractor wanted the drywall crew inside by 6:30 every morning. However, sunrise that week came well after 7. So my foreman handed me six boxes of incandescent stringers, a bag of zip ties, and a hand drawn floor plan on the back of a lumber invoice. By the end of the week, half the bulbs had broken. In addition, two runs tripped every time the framers fired up a compressor, and the drywall foreman was taping his work by headlamp.
That week taught me more about temporary lighting than any code class did. Since then, the gear has changed a lot. In fact, LED strings have pretty much replaced the old incandescent strands on every job I bid. Still, the mistakes I see on site are the same ones I made back then: not enough light where people actually work, runs tied to the wrong circuits, and strings hung in ways the manufacturer and OSHA never intended.
This article walks through how I plan coverage, how I hang and power construction string lights, and what I check before I let a crew work under them. I wrote it for general contractors, remodelers, and electricians who are tired of guessing.
Why Construction String Lights Became the Default
There are plenty of ways to light a jobsite. For example, you can use tripod floods, balloon lights, rechargeable work lights, temp high bays, or tower lights out in the yard. Each one has a place. However, for general overhead lighting inside a building under construction, a good string is hard to beat.
The supply house folks at Van Meter put it plainly in their comparison of LED temp construction lights: strings give you overhead light, they hold up, and nobody can trip over them or knock them down. At the same time, they admit the downside. Hanging and pulling them is tedious, so they make the most sense when you’ll be on the job for a while.
That matches what I’ve seen. For instance, on a two day bathroom gut, I bring a couple of rechargeable lights and call it good. On a twelve week commercial fit out or a new custom home, however, I string the whole building in the first week and leave it up until the permanent fixtures go live.
LED strings in particular changed the math for us in three ways:
Lower load. A 100 foot LED string draws a fraction of what an old incandescent stringer did. As a result, you get more strings per circuit and fewer nuisance trips.
Less breakage. Molded or polycarbonate lamps survive a bump from a ladder or a swinging 2×4 far better than glass bulbs. Before, I budgeted a case of replacement lamps per floor. Now I carry a handful.
Less heat. Hot bulbs near insulation, house wrap, or plastic sheeting always made me nervous. Because LEDs run cool, I worry far less about that.
Start With the Rules That Govern Construction String Lights
I don’t like articles that bury the code section at the bottom, so let’s get it out of the way first. Two big rulebooks govern construction string lights in the United States: OSHA’s construction standards and the National Electrical Code. On top of both sits your local inspector, also called the authority having jurisdiction, or AHJ.
OSHA Illumination Levels for Construction String Lights
OSHA’s construction illumination rule, 29 CFR 1926.56, sets minimum light levels in foot candles for different work areas whenever work is going on. A foot candle is one lumen landing on one square foot of surface. Below are the numbers I use every day from Table D-3:
| Area | Minimum foot candles |
|---|---|
| Excavation, concrete placement, access ways, active storage | 3 |
| General construction area lighting | 5 |
| Indoor corridors, hallways, warehouses, exitways | 5 |
| Shops, mechanical and electrical rooms, carpenter shops, indoor toilets | 10 |
| First aid stations, infirmaries, offices | 30 |
Now, a quick note on where this stands. In July 2025, OSHA published a proposed rule to rescind the construction illumination standard, arguing that the need for light on a jobsite is obvious. In response, contractor groups including AGC and ARTBA pushed back and asked OSHA to keep the standard as written. Their concern is that without a table, nobody knows what an inspector will consider “enough” under the general duty clause.
So my advice is simple. Whatever happens with that rulemaking, keep using Table D-3 as your floor. After all, it’s a reasonable, measurable target. Besides, it’s a lot easier to defend a light meter reading than a gut feeling after someone falls down a stairwell.
OSHA Electrical Rules for Temporary Lights
Meanwhile, the rules that actually shape how you hang construction string lights live in 29 CFR 1926.405. These are the ones I check on every walk:
Guard every lamp against accidental contact or breakage. Also, ground any metal case sockets.
Don’t hang temporary lights by their cords unless the manufacturer designed the cords and lights for that.
Use cords with a hard or extra hard usage rating for all temporary lights.
Run portable lights in wet or conductive spaces like tanks and drums at 12 volts or less, or else at 120 volts with GFCI protection.
Skip brass shell, paper lined lampholders entirely, because OSHA bans them.
Separately, OSHA’s rule on cords in 1926.416 says you can’t staple extension cords, hang them from nails, or suspend them by wire. Therefore, keep that in mind when someone on site grabs a hammer and a box of 16s to “help.”
OSHA also addressed string lights directly in a 1986 interpretation letter about McGill String-O-Lights. For one thing, it points out that heavy duty cord types like S, SO, ST, and STO meet what the standard means by hard usage. In addition, it says compliance officers too often find lights hung by wrapping them around pipes and steel beams. Honestly, someone could have written that sentence about half the jobs I walk today.
NEC Article 590 and Construction String Lights
Article 590 of the NEC covers temporary power and lighting. However, it doesn’t replace the rest of the Code. As the editors at EC&M explain in their breakdown of temporary installations, Chapters 1 through 4 still apply unless Article 590 specifically changes something.
Two provisions matter most for construction string lights:
Section 590.4(D): On a construction site, this section bars receptacles from any branch circuit that supplies temporary lighting. That way, the lights stay on when a tool circuit’s GFCI trips.
Section 590.6: In addition, this section requires GFCI protection for personnel on receptacles that crews use for construction, remodeling, maintenance, repair, or demolition.
Finally, Article 590 says temporary wiring comes out when the job is done. In other words, “temporary” is about time, not about quality. That’s why I tell every apprentice that the temp lights get the same care as anything we leave behind in the walls.
Planning Coverage for Construction String Lights
Here’s where most people go wrong. First, they buy a pallet of strings. Then they start at the panel and keep hanging until they run out. After that, they wonder why the back bedrooms are dark and the hallway looks like a stadium.
Instead, I plan construction string lights the same way I’d plan a permanent lighting layout, just with looser tolerances.
Step 1: Walk the Building and Mark the Zones
To begin with, I walk every floor with the plans and a marker. Then I sort the space into three groups:
Production areas are where people install, cut, tape, and finish. Therefore, these get the most light.
Travel paths include corridors, stairs, ramps, and the route from the entrance to the dumpster. Because people move through them constantly, these need even, continuous light with no dark gaps.
Hazard spots include floor openings, shaft walls, unprotected edges, and stair landings. These get light whether or not anyone is working there.
Stairwells, in particular, deserve their own mention. Every landing and every flight gets light. In fact, most of the serious falls I’ve seen on temp lit jobs happened on stairs, usually on the one flight someone decided didn’t need a string.
Step 2: Pick a Target, Not Just a Minimum
OSHA says 5 foot candles for general construction areas. However, that’s a minimum, not a goal. Five foot candles is enough to walk safely. Yet it’s not enough to read a tape measure on a dark floor or catch a drywall flaw.
So my targets look like this:
Travel paths and storage: 5 to 7 foot candles
General production areas: 10 foot candles
Finish work like paint, tape, trim, and tile: 20 or more, usually by adding task lights to the strings
Planning for double the minimum also gives you margin for burned out lamps, dust on the lenses, and the shadow a scissor lift throws.
Step 3: Do the Lumen Math for Your Construction String Lights
You don’t need lighting software for temp work. Instead, you need a calculator and an honest guess at how much light actually reaches the floor.
Here’s the formula I use:
Lumens needed = floor area (sq ft) × target foot candles ÷ 0.6
That 0.6 is my rough allowance for light lost to height, open framing, dark subfloors, dust, and walls that soak up light instead of bouncing it. In a primed, drywalled space with a low ceiling, you’ll do better. On the other hand, in an open shell with a black deck overhead, you’ll do worse.
For example, take a 40 by 60 foot basement slab. That’s 2,400 square feet.
At OSHA’s 5 foot candle minimum: 2,400 × 5 ÷ 0.6 = 20,000 lumens
At my 10 foot candle target: 2,400 × 10 ÷ 0.6 = 40,000 lumens
Next, look at the box. If your construction string lights put out around 15,000 to 20,000 lumens per 100 foot string, then that basement needs two or three strings to hit my target. One string might technically get you close to the minimum on paper. Even so, it won’t feel like it.
Step 4: Lay Out the Runs
Lumens tell you how much light you need. Spacing, however, tells you whether it lands evenly. For instance, a single string down the center of a wide room makes a bright stripe and two dark edges.
These are my working rules:
Space parallel runs about 1 to 1.5 times the mounting height apart. So, with strings at 8 feet, keep runs 8 to 12 feet apart.
Keep the outermost run within half that spacing from the wall. Otherwise, the perimeter goes dim, and that’s where a lot of the actual work happens.
Follow the travel path first, then fill the rooms. Generally, a continuous run down a corridor with short branches into rooms beats snaking one string through every doorway.
Mark spots for task lights. Strings handle general light, but don’t expect them to light a countertop install perfectly.
On a typical residential floor, I end up with one main run down the hall and a dedicated string for every large room. Closets and small baths often pick up enough spill from the hallway. Still, I check with a meter before I trust that.
Hanging Construction String Lights the Right Way
Even good layout falls apart if you hang the strings badly. So here’s how I do it on my jobs.
Use the Hangers Your Construction String Lights Came With
Quality construction string lights come with built in hooks, carabiners, or molded cages with a hanging point. Use them, because that’s the whole reason OSHA allows suspension “designed for this means of suspension.”
Here’s what I don’t allow:
Wrapping the cord around a pipe, joist, or beam
Hanging the string from a nail or screw head
Tying the cord in a knot around anything
Using tie wire, since it can cut into the jacket and eventually the insulation
On the other hand, here’s what I do use:
The fixture’s own hooks clipped onto a messenger line of rope or cable strung tight between supports. As a result, the weight comes off the cord and the run stays straight.
Nonconductive cable ties, kept loose around the messenger rather than cinched into the cord jacket.
Insulated hooks or purpose made temp lighting hangers screwed into framing. Then the string clips to them by its own hanger points.
Height and Clearance
I hang strings high enough that nobody carrying a sheet of drywall or a ladder will hit them. On most residential jobs, that means as close to the ceiling framing as practical, usually 7 feet or higher. Similarly, in open commercial shells I tie to the underside of the structure or to a messenger at a consistent height.
Also, keep strings clear of:
Areas where the framers are still setting trusses or joists
Spots where drywall lifts will go up
HVAC trunk lines and plumbing the other trades haven’t installed yet
When the trades need a string moved, they call us. I’m firm about that, because a carpenter relocating a run with a nail gun is exactly how nails end up through cord jackets.
Cords Crossing Doorways and Floors
Cords pass through doorways all day on a jobsite. However, OSHA allows that only when something protects the cord from damage. For that reason, I use cord protectors or route the feed up and over the header. That way it never runs along the floor, where the door can pinch it or a pallet jack can roll over it.
Any cord that touches the floor in a travel path is both a tripping hazard and a crushing hazard. Consequently, I try to get every feeder off the floor by the end of setup day.
Powering Construction String Lights Without Nuisance Trips
Most temp lighting complaints I get come down to power, not lamps.
Give Lights Their Own Circuit
This is the single biggest improvement you can make. In fact, it’s what Article 590.4(D) is getting at. Lighting circuits feed lighting only, while tool receptacles go on separate circuits.
For example, when a tile saw with a nicked cord trips its GFCI, the guy cutting tile should lose his saw, not the stairwell lights for three floors. I’ve seen a single tripped circuit put a whole building into darkness on a late winter afternoon. Nobody suffered an injury that day, but that was luck.
My standard setup on new construction looks like this:
First, a temp power pole or spider box at each floor or zone
Next, at least one circuit labeled LIGHTS ONLY at each distribution point
Finally, strings plugged into a GFCI protected receptacle on that dedicated circuit, which no tools share
I put a bright label on that receptacle. Then I put a second label, because someone always tapes over the first one.
Know Your Load and Your Linking Limit
A 20 amp, 120 volt circuit gives you 2,400 watts on paper. However, for lighting that runs all day, I size at 80 percent, which is 1,920 watts. Because LED construction string lights draw so little, you’d think you could link a dozen on one circuit.
Don’t. The real limit is usually the string itself. Every listed string has a maximum number of strings you can connect end to end, and the manufacturer prints it on the label or in the instructions. The conductors and connectors inside the string set that limit, not your breaker. So if you exceed it, you’re overloading the first string in the chain, even if the breaker never trips.
Here’s my habit:
First, read the label and write the linking limit on the box with a marker
Also, never link more than the label allows, even if the math on the breaker says it’s fine
In addition, feed long runs from the middle with a separate cord instead of daisy chaining from one end
Running Construction String Lights on Generators
On jobs before we set the temp service, we run lights off generators. In that case, a few things change:
Make sure the generator’s receptacles have GFCI protection, or else feed through a GFCI device
Keep lighting on a separate output from tools whenever the generator allows it
Put the generator outside, away from openings, so the exhaust can’t drift into the building
Plan for Power Loss
When the power goes out, it goes out everywhere at once. That’s why I keep battery backed emergency lights or rechargeable work lights at the top and bottom of every stairwell and at the main exit. Likewise, OSHA training materials have said for years that dark areas without temporary or permanent lighting need portable emergency lighting. It costs very little. Even so, it’s the difference between an annoying outage and an injury.
Choosing Construction String Lights That Survive the Job
The cheapest construction string lights on the shelf usually look fine in the store. However, they rarely survive a full job.
So here’s what I look for:
A listing from a recognized lab like UL or ETL for the string as an assembly, not just for the lamps
A hard usage cord clearly marked on the jacket, with SJTW at minimum and heavier cord for rough duty
A wet or damp location rating for anything that might see rain, wet slab, or pressure washing
Integrated guards or cages around every lamp
Built in hangers at each lamp or at regular intervals
Molded connectors with a weather seal when linked
Lamp spacing around 10 feet on a 100 foot string, because that gives you even light without hot spots
The editors at Electrical Contractor magazine covered how today’s temporary construction site lighting has become more rugged and safer, including flat wire and molded cable string designs. That shift is real. As long as you coil them properly and store them dry, a good set of LED strings will last several jobs.
A Pre Work Checklist for Construction String Lights
Before a crew starts work under a new set of construction string lights, I walk it. Usually, it takes ten or fifteen minutes on a typical floor.
Light levels
First, spot check production areas with a light meter at floor or bench height
Then confirm every stair flight and landing has light
After that, look for dark spots near walls and corners
Mounting
Every string hangs from its own hangers or a messenger line
Also, no cord wraps around pipes or steel
Likewise, no staples, nails, or wire hold any cords
Condition
Every lamp has its guard in place and no damage
In addition, no cord jacket shows cuts, crush damage, or tape
Every connector sits fully home with its seal in place, too
Power
Lighting runs on a dedicated circuit, separate from tool receptacles
GFCI protection is in place, and I’ve pressed the test button on each device
Every chain stays within its linking limit, so long runs take power from more than one point
Finally, emergency lights sit at stairwells and exits
OSHA has noted in an interpretation letter on illumination that the best way to confirm light levels is a meter reading at the work surface. Besides, a basic light meter costs less than a single replacement string. For that reason, I keep one in my truck and another in the gang box.
Common Construction String Lights Mistakes I Still See
Even after a lot of years doing this, the same handful of problems come up over and over.
One string per floor. A single run down a hallway looks impressive from the entrance. Then you walk into the back bedroom and can’t see your feet.
Tools on the lighting circuit. Someone plugs a heater or compressor into the light circuit “just for a minute.” Eventually, that minute turns into a trip, and the stairs go dark.
Hanging from pipes and steel. Admittedly, it’s fast and it feels secure. However, it’s exactly what OSHA called out in 1986, and it’s still how cords wear through.
Ignoring the linking limit. Twelve strings in a row from one receptacle works fine until, suddenly, the first connector melts.
Leaving temp lights too long. Once the inspector accepts the permanent lighting, the temp strings come down. Article 590 is clear on that. Besides, dangling temp strings in a finished space look terrible during the punch walk.
No backup lighting. For example, a storm knocks out the temp service while everyone is on the third floor. Meanwhile, nobody has a flashlight.
When to Call a Licensed Electrician
Plenty of contractors hang their own construction string lights, and on small remodels that’s often fine. However, call a licensed electrical contractor when:
You need a temporary service or temp power poles installed
The building is multistory or commercial
You keep seeing GFCI trips you can’t track down
The AHJ wants a temp lighting plan or inspection
You’re feeding lights from generators across several areas
A good electrical sub plans temp lighting the same way they plan permanent work. Also, it shouldn’t cost a fortune, and it saves time every single morning of the job.
Final Thoughts
In short, construction string lights are one of the cheapest safety upgrades on any jobsite, but only when you plan, hang, and power them with some care. So start with the OSHA numbers and aim higher than the minimum. Then do the lumen math, give lighting its own circuit, and hang every string the way the manufacturer intended. Finally, walk it before the crew gets there.
That apartment job with the broken incandescent stringers was a long time ago. Even so, I still think about the drywall foreman taping by headlamp. Nobody on my jobs should have to work like that, and with today’s LED gear, nobody does.
Frequently Asked Questions About Construction String Lights
How many foot candles do construction string lights need to provide?
For general construction areas, OSHA’s Table D-3 in 1926.56 sets 5 foot candles as the minimum. Meanwhile, shops and mechanical rooms need 10, and offices and first aid stations need 30. For real production work, however, I plan around 10 foot candles.
Can I hang construction string lights by their cords?
Only if the manufacturer designed the cords and lights for that. Otherwise, OSHA 1926.405 prohibits suspending temporary lights by their electric cords. Instead, use the string’s built in hooks or a messenger line.
Do temporary string lights need to be on their own circuit?
On construction sites, NEC 590.4(D) bars receptacles from any branch circuit that supplies temporary lighting. As EC&M’s overview of Article 590 explains, this keeps lights on when a tool circuit’s GFCI trips.
Is OSHA getting rid of construction lighting requirements?
OSHA proposed rescinding 1926.26 and 1926.56 in July 2025. In response, industry groups have urged OSHA to keep the standard. Either way, every jobsite still needs adequate lighting.
What cord type should construction string lights use?
OSHA requires hard or extra hard usage cords for temporary lights. For example, its 1986 interpretation letter lists S, SO, ST, and STO cords as types that qualify.
Are LED string lights better than other temporary lighting?
For overhead lighting on longer jobs, usually yes. Van Meter’s guide to LED temp construction lights notes that strings are durable and stay out of the way. However, they take longer to install than portable lights.
References
OSHA 29 CFR 1926.56, Illumination
Federal Register: Construction Illumination Proposed Rule (July 2025)
OSHA 29 CFR 1926.405, Wiring Methods, Components, and Equipment for General Use
OSHA Standard Interpretation on Temporary Lighting Strings (1986)
Electrical Contractor Magazine: Today’s Temporary Construction Site Lighting
OSHA Standard Interpretation on Minimum Illumination at Construction Sites (1991)
Van Meter: Pros and Cons of LED Temp Construction Lights for Job Sites
Construction Equipment Guide: If It Ain’t Broke, Don’t Fix It
ConstructConnect: Construction Lighting, Ins and Outs of Illuminating Your Worksite