
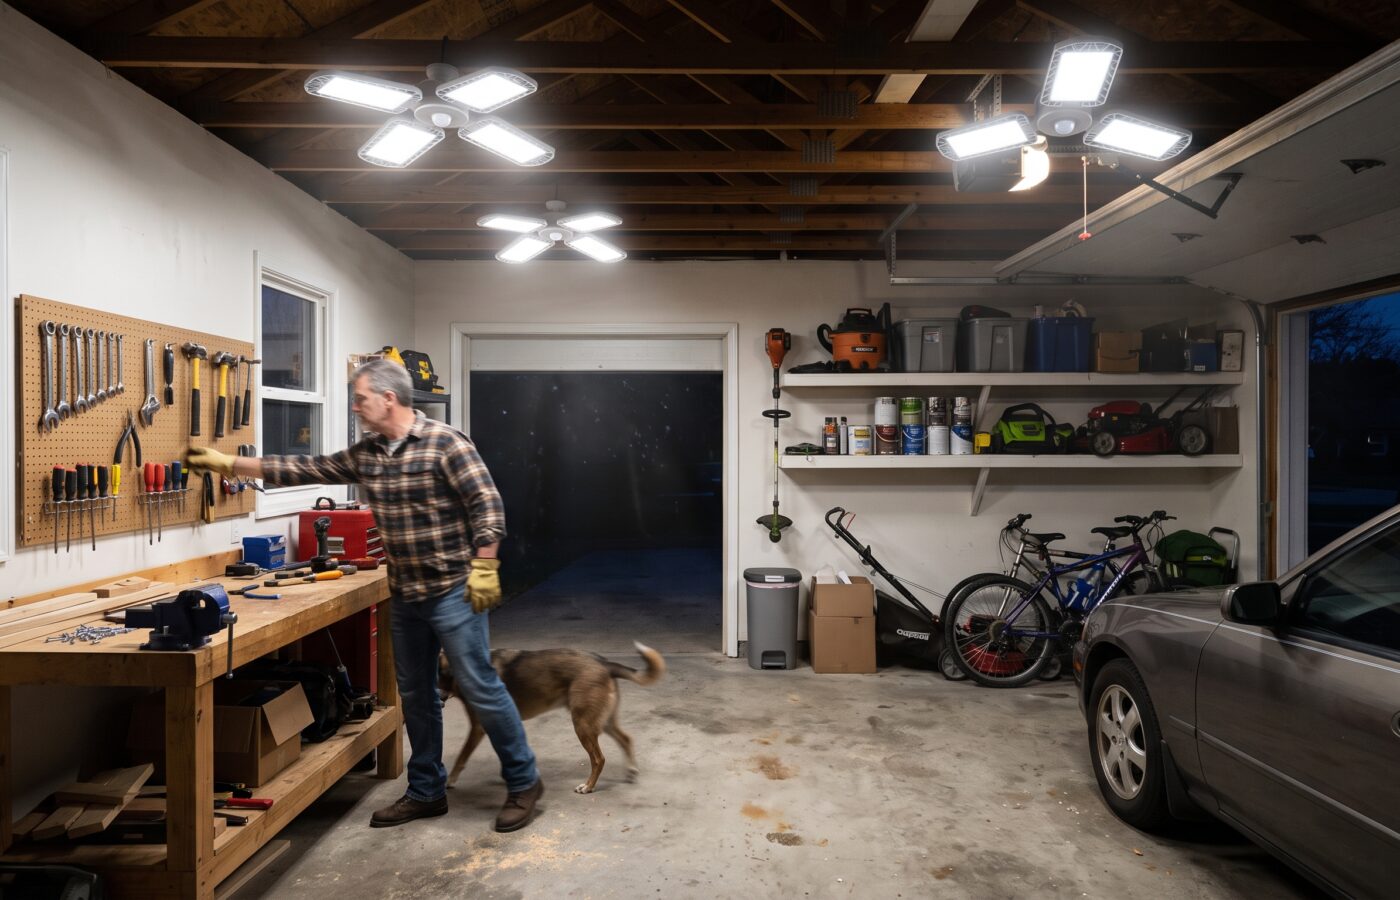
Motion-Sensor LED Work Lights for Garages and Home Workshops

Most garage lighting problems I get called about are not really brightness problems. Instead, they are control problems, and that is exactly where a motion sensor work light earns its keep. Picture a homeowner walking in from the driveway with both arms full, fumbling for a switch on the far wall, and tripping over a mower deck in the dark. On the other hand, someone finishes a weekend project, closes the door, and four 5,000 lumen fixtures burn all week because nobody remembered the switch by the side entry.
After years designing and troubleshooting residential electrical systems, I have come to see the motion sensor work light as one of the simplest upgrades that actually changes how a garage feels to use. When it is done well, the light is simply there when you need it. However, when it is done badly, it turns off while you are halfway through a cut on the miter saw, and you end up taping over the sensor in frustration.
This guide is about doing it well. Specifically, I will walk through how the sensors work, how much light you actually need, where to mount fixtures, what the electrical code says, and the mistakes I keep finding in garages that were wired by someone in a hurry.
Why a Garage Is the Right Place for a Motion Sensor Work Light
A garage is a transitional space. In other words, you pass through it more often than you work in it. That usage pattern is exactly what motion and occupancy controls were built for. In fact, the U.S. Department of Energy notes that lighting controls save energy and money by automatically shutting lights off when nobody needs them, and a garage is a textbook case of intermittent use.
There are three practical wins:
Safety on entry. The most dangerous moment in a garage is the first five seconds after you walk in. Oil spots, extension cords, kids’ bikes, and the step down from the house all hide in the dark. For that reason, a light that responds before your foot lands is worth more than a brighter light you have to go find.
No forgotten lights. LEDs draw far less than old fluorescent tubes or halogen work lights. Even so, a bank of high output shop lights left on for a week still adds up, and it puts pointless wear on the drivers.
Security. Lights that come on when someone moves inside or near the side door act as a deterrent. Besides that, they tell you instantly if a raccoon has found its way in.
Savings Depend on Setup
The energy savings are real, but they depend heavily on setup. For example, in one federal field demonstration, the DOE compared occupancy sensor controlled LED installations and found results ranging from an extra 76% in savings beyond the LED conversion to almost no added savings at all. As it turned out, the difference came down to product choice and how the systems were installed and tuned. That lines up with what I see in homes, since the hardware matters less than the commissioning. The same principle drives commercial projects too, as covered in our guide to choosing a warehouse work light.
How a Motion Sensor Work Light Actually “Sees” You
Before buying anything, it helps to understand what is inside that little dome or lens. After all, the sensor type decides where your motion sensor work light will perform well and where it will frustrate you.
Passive Infrared (PIR)
You will find this sensor in most consumer work lights. Unlike other types, it does not emit anything; instead, it watches for changes in heat. Each unit reads infrared energy given off by bodies in its line of sight, using a pyroelectric element as its core component. In front of that element, a segmented lens divides the room into zones. Consequently, when a warm body moves from one zone to another, the sensor trips.
The key phrase there is line of sight. Leviton’s technical comparison points out that PIR sensors need a direct line of sight to the person. Inside a garage full of shelving, a parked SUV, and a tall tool chest, that matters a great deal. For instance, if you are kneeling behind the car changing brake pads, a ceiling PIR on the other side may simply not see you. For that kind of floor level job, a tripod work light fills the shadows the ceiling can’t reach.
This sensor type also has a directional weakness. Generally, it is best at detecting movement across its field and weaker at detecting someone walking straight toward it. Because a person approaching head on crosses fewer zones, the trigger can lag.
Microwave (Doppler)
By contrast, microwave sensors work the other way around, because they are active devices. These units rely on the Doppler effect, sensing the speed and presence of a moving object within the detection field. As a result, they pick up very small movements and, unlike PIR, they do well with someone walking directly at them.
In addition, microwave sensors can detect slight movement through low density materials. That is both a blessing and a curse. On the plus side, the sensor can see you behind a cardboard box. Unfortunately, it may also see a car pulling up on the other side of a thin garage door, or a curtain moving in front of a vented window. Many of the deformable “garage bulb” lights sold online use microwave sensors, which explains a lot of the complaints about lights flashing on for no visible reason.
There is a small power difference too. One manufacturer puts a typical PIR draw at roughly 1 watt versus about 1.5 watts for a microwave sensor. Still, in a home garage that gap is trivial, so I would never choose a sensor on that basis.
Dual Technology
These sensors combine PIR with microwave or ultrasonic detection. Typically, both technologies must agree before the light turns on, while either one can keep it on. Therefore, false triggers drop, and the light no longer cuts out on someone who is working quietly. For a serious home workshop, this is the type I specify most often in wall or ceiling sensors, even though fixtures with integrated dual sensing are less common in the consumer aisle.
Which Motion Sensor Work Light Type Suits a Garage?
My rule of thumb:
- Simple parking garage with a clear floor: PIR is fine and inexpensive.
- Cluttered garage or workshop with shelving and a parked car: microwave or dual technology, aimed carefully.
- Workshop where you stand still for long stretches: dual technology, or a sensor that can run in manual on mode (more on that later).
How Much Light Should a Motion Sensor Work Light Deliver?
Here is where many people overbuy in one area and underbuy in another. After all, a garage is rarely one space. Rather, it is a parking bay, a storage wall, and a workbench sharing one ceiling.
The Two Numbers Worth Remembering
Bob Vila summarizes the Illuminating Engineering Society guidance well: about 50 lumens per square foot for a residential garage and 300 lumens per square foot for workshop zones. Those two numbers are worth remembering because they are so far apart. In practice, you do not need 300 lumens per square foot over the car. However, you absolutely want it over the bench.
To size it, multiply the lumen target by the square footage of each functional area. Following that method, a nine square foot workbench at 300 lumens per square foot calls for about 2,700 lumens.
A Worked Example
Let’s run a typical example: a two car garage of about 400 square feet.
- Ambient at 50 lumens per square foot: 20,000 lumens total.
- Workbench zone of 8 by 3 feet (24 square feet) at 300 lumens per square foot: about 7,200 lumens of task light, concentrated.
In that case, I would cover the ambient load with four to five linear LED shop lights around 4,000 to 5,000 lumens each, then add a dedicated task fixture or two directly over the bench. Here, the motion sensor work light handles the ambient layer. Meanwhile, the bench task light usually gets its own switch, because you want full control there.
Ceiling Height and Wall Color
One more factor is how high your ceiling sits. Those lumen targets assume a fairly standard ceiling around 8 to 10 feet. With a 12 or 14 foot ceiling, however, more light is lost before it reaches the work surface, so a narrower beam or a higher output fixture becomes necessary. In tall shop garages, a compact industrial LED flood light aimed at the bench can do that job. Paint matters too. Notably, a garage with raw drywall or dark walls will feel dimmer than one with white, semi gloss walls at the same lumen count.
Color Temperature and CRI for a Motion Sensor Work Light
Color Temperature
Kelvin is the unit used to measure this. Lower numbers look warm and yellow, whereas higher numbers look cool and blue. For garages and workshops, the sweet spot is around 4,000K to 5,000K. Similarly, an Instructables workshop lighting guide found that most woodworkers and garage builders settle on 5,000K, with some preferring a slightly warmer 4,000K.
You will often see a motion sensor work light sold at 6,500K, which is very blue. Admittedly, it looks bright on the box, and some people like it. In my experience, though, it tends to feel harsh after an hour and makes skin tones and wood grain look odd. For that reason, I steer clients toward 5,000K for the main fixtures.
Above all, keep it consistent. Otherwise, a 6,500K motion fixture next to a 3,000K bench lamp creates a patchwork that your eyes keep adjusting to.
Color Rendering Index (CRI)
This rating tells you how faithfully a light shows true color, on a scale up to 100. Unfortunately, cheap high lumen fixtures often hit their brightness numbers by sacrificing CRI. For parking and storage, CRI 80 is acceptable. By contrast, woodworking, finishing, painting, or wiring work where you need to tell a brown conductor from a red one in a junction box calls for 90 or higher. Likewise, Bob Vila suggests a CRI of 85 to 100 for anyone matching paint or judging wood finishes, which is a reasonable floor.
Choosing the Right Motion Sensor Work Light Form Factor
There are four common ways to get a motion sensor work light into a garage, and each fits a different situation. Battery powered stick up sensor lights exist too, but LED work light battery life limits them to closets and corners rather than a main garage circuit.
1. Screw In “Deformable” Garage Lights
These are the folding panel lights that thread into a standard E26 socket, usually the bare porcelain lampholder that came with the house. Understandably, they are popular because installation takes thirty seconds and requires no wiring.
My honest take is that they are a decent stopgap and fine for a storage garage. Even so, use some caution:
- They put a lot of weight and heat on a lampholder that was never designed for it, so check that the socket is in good condition and the box is secure.
- Many use microwave sensors with short, fixed or barely adjustable time delays. In fact, buyer reviews often complain that the light shuts off after 15 to 30 seconds.
- Lumen ratings on the box are frequently optimistic.
2. Linear LED Shop Lights With Integrated Sensors
These are 4 foot or 8 foot fixtures, either hardwired or plug in, with a sensor built into the housing. For a real workshop, this style of motion sensor work light is my preferred option. With this setup, you get even light distribution across the ceiling, and you can link several fixtures so one sensor triggers the whole row.
If you go with plug in shop lights, plug them into a ceiling receptacle. Also remember that garage receptacles must be GFCI protected under the National Electrical Code. Indeed, the St. Paul inspection checklist for garages cites NEC 210.8(A)(2), requiring GFCI protection on all 125 volt, 15 and 20 amp garage receptacles. That includes the ceiling outlet for your lights.
3. Sensor Switch Controlling Existing Fixtures
Sometimes the best motion sensor work light is the fixture you already have, controlled by a wall mounted occupancy sensor switch. This is my go to for people who already invested in good LED shop lights. That way, one sensor at the entry door controls the whole ambient circuit. Some smart LED work lights add app scheduling and remote control on top of motion sensing, if you want more flexibility.
4. Ceiling Mounted Standalone Sensor
For large or L shaped garages, a 360 degree ceiling sensor wired to a power pack gives far better coverage than a wall switch sensor that only sees part of the room. Admittedly, this is more involved and usually a job for a licensed electrician. Nevertheless, it is the most reliable way to cover a three car garage or a shop with a separate bench alcove.
Placing and Aiming Your Motion Sensor Work Light
I could tell you a dozen stories of perfectly good sensors that got blamed for bad placement. So here is what actually matters.
Cover Entry Points and the Parked Car
Start with the entry points. The sensor must see you the moment you step in from the house door, the side door, and ideally as the overhead door opens. For example, if the only sensor is on a fixture in the middle of the ceiling and a parked truck blocks its view of the house door, you will walk into darkness every time.
Account for the parked vehicle. To a PIR sensor, a car is a big wall. So picture the room with the car in it, and check that the sensor can still see the workbench and the walkway on both sides.
Avoid False Triggers
Watch the overhead door. Microwave sensors in particular can see through the thin panels of a garage door and react to traffic in the driveway. In that situation, turn the range down or angle the sensor away.
Keep it away from heat sources. Because PIR sensors react to heat changes, a space heater, a water heater flue, or a furnace in the corner can cause false triggers when it cycles. Whoever services that furnace will be glad of a dedicated LED work light for HVAC technicians rather than relying on the garage lights.
Test Before You Commit
Tape it up first. One tip from a UK lighting retailer that I fully agree with: temporarily tape the sensor light where you plan to mount it and walk the garage to see where it triggers. Overall, it takes five minutes and saves a second trip up the ladder.
Mind the height. Placed too high, the sensor misses small movements at bench level. Conversely, placed too low, it picks up false triggers from pets or passing cars.
Motion Sensor Work Light Time Delay: The Setting That Makes or Breaks It
If I could get every homeowner to change one setting, it would be the time delay. Most sensors ship with short delays, often 30 seconds to a few minutes, because it looks good in energy calculations. In a workshop, however, that is a recipe for the lights going dark while you are reading a tape measure.
Recommended Motion Sensor Work Light Delay Settings
- Pass through garage, parking and storage: 3 to 5 minutes.
- Active workshop use: 15 to 30 minutes, or switch to manual mode while you work.
The DOE’s own field work supports a careful look at delay settings. Specifically, in a federal building demonstration, researchers examined how the default delay setting on the motion sensors affected results and found potential savings were being left unused. The lesson for a home garage, then, cuts both ways. Long delays waste power, while short ones push people to defeat the system. Personally, I would rather a client accept slightly lower savings and keep using the sensor than set it to 30 seconds and end up taping over it.
Occupancy vs. Vacancy Mode
This distinction is underrated. With an occupancy sensor, lights turn on automatically and off automatically. A vacancy sensor, on the other hand, requires you to turn lights on manually but still turns them off automatically.
At a garage entry, occupancy mode is what you want. For a dedicated workbench, though, I often set up vacancy mode or a manual override. That way, you choose when the bench light comes on, and the sensor simply makes sure it goes off if you forget.
Using a Motion Sensor Work Light Safely Around Power Tools
This is the section I wish more product listings included. Simply put, a light that shuts off while a blade is spinning is a hazard. So if you run a table saw, router table, lathe, or grinder in your garage, do not rely on a short delay motion sensor work light as your only light source at that station.
My approach in workshops:
- First, put the main ambient lights on a motion sensor with a long delay.
- Next, give each power tool station its own task light on a regular switch or vacancy sensor. A magnetic work light stuck to a steel bench or machine base makes a quick, movable task light.
- Finally, if budget allows, use a dual technology sensor that holds the lights on when it detects even minor motion such as hand movement at the bench.
It also pays to keep a charged rechargeable work light on the bench, so a tripped breaker never leaves you in the dark next to a coasting blade.
Also check for flicker. Low quality LED drivers can flicker at frequencies you may not consciously notice. Under some conditions, that flicker can make a spinning blade appear slower or stationary. Therefore, buy fixtures from reputable manufacturers that state flicker performance, and avoid cheap dimmers on LED workshop circuits.
What the Electrical Code Says About a Motion Sensor Work Light
Codes vary by jurisdiction and edition, so always confirm locally. Unlike temporary job site lighting requirements, these rules govern the finished home. That said, here are the points from the National Electrical Code that come up in nearly every garage project I work on.
A Switch Controlled Light Is Required
At least one wall switch controlled lighting outlet is required in hallways, stairways, and both attached and detached garages that have electric power. Furthermore, the 2023 NEC phrases this as a lighting outlet controlled by a listed wall mounted control device and extends it to accessory buildings with power.
Occupancy Sensors Can Serve as the Switch
The NEC permits lighting outlets to be controlled by occupancy sensors that are either in addition to wall switches, or installed at the usual switch location with a manual override that lets the sensor act as a wall switch. In plain terms, a motion sensor wall switch with an on/off button is acceptable. By comparison, a screw in motion bulb alone, with no wall switch at all, does not satisfy the requirement.
Exterior Entry Lighting
For dwellings and garages with power, at least one switch controlled light must illuminate the outside of entrances with grade level access. Notably, the vehicle door is not considered one of those entrances. Even so, the side door of your garage needs an exterior light, which makes it a perfect spot for an outdoor rated motion fixture. A solar rechargeable work light with motion sensing can supplement it along a detached shed or driveway, but it does not replace the required switched fixture.
Neutral at the Switch Box
Most modern occupancy sensor switches need a neutral conductor to power their electronics. Current code generally requires a neutral at switch locations for exactly this reason; older homes, however, often lack one. So if your switch box only has two hot wires and a ground, do not use the ground as a neutral. Doing so creates a shock hazard and a code violation. Instead, either choose a sensor rated to work without a neutral or have an electrician run one. Whoever opens that crowded box will want one of the best work lights for tight spaces.
Minimum Load
Some older two wire sensor switches leak a tiny current through the load to power themselves. With very low wattage LED loads, that can cause ghosting or flicker. For this reason, check that the sensor is rated for LED loads and that your connected load meets its minimum.
Garage Conditions That Affect a Motion Sensor Work Light
Unlike a living room, a garage is a harsh environment. Throughout the year, fixtures here sit through freezing winters, humid summers, and a constant drift of sawdust.
Cold starts. LEDs themselves actually perform well in the cold. Cheap drivers and some PIR sensors, however, can behave poorly at low temperatures. So if you live somewhere with hard winters and an unheated garage, check the rated operating temperature range of any motion sensor work light before you buy.
Dust. Over time, sawdust on a PIR lens reduces sensitivity, so wipe the lens occasionally. Additionally, in a heavy woodworking shop, choose fixtures with sealed housings and a decent ingress protection rating.
Damp locations. Any garage near a wash bay, or one that sees a lot of melting snow off cars, should have damp rated fixtures at minimum.
Flammable vapors. If you spray finishes or handle fuel in a closed garage, ordinary fixtures and portable lights are the wrong tool near those vapors. That is explosion proof work light territory.
Common Motion Sensor Work Light Mistakes I Keep Finding
After many garage inspections, these are the repeat offenders:
- One sensor, wrong spot. A single fixture with a sensor in the center of a cluttered garage, blind to the house door.
- Delays set to the factory minimum. Lights cut out during use, so the owner switches the sensor off permanently.
- Mixed color temperatures. A 6,500K motion fixture next to 3,000K bench lights.
- Ground used as neutral to make a sensor switch work in an old box.
- No manual override. The owner cannot keep lights on for long sessions.
- Overloaded lampholders from heavy deformable lights hanging off an old porcelain socket.
- Plug in shop lights on a non GFCI ceiling receptacle.
- Ignoring the overhead door. Microwave sensors flashing every time a car passes the driveway.
My Recommended Motion Sensor Work Light Setup for a Two Car Garage
If a client asked me for a straightforward, reliable layout for a 20 by 20 foot garage with a workbench along one wall, here is roughly what I would specify:
- Ambient layer: four to five 4 foot linear LED shop lights, 5,000K, CRI 90, about 4,000 to 5,000 lumens each, hardwired and linked on one circuit.
- Control: a wall mounted dual technology occupancy sensor switch at the house entry door, with manual override and the delay set to around 10 minutes. Alternatively, if the garage is long or L shaped, a ceiling sensor with a power pack.
- Bench layer: one or two task fixtures directly over the bench on a separate switch or vacancy sensor, matched at 5,000K.
- Exterior: an outdoor rated motion fixture at the side entry door.
- Protection: GFCI protection on all garage receptacles, including any ceiling outlet feeding plug in lights.
Taken together, that layout balances safety, convenience, and efficiency, and it does not fight the person using the space.
Final Thoughts
A motion sensor work light is not complicated technology, but it rewards a little planning. To sum up, know which sensor you are buying, size the lumens to each zone, aim the sensor where people actually enter, set a delay that respects how you work, and follow the code requirements for switching and GFCI protection. Do those things, and the light simply disappears into the background, which is the best compliment any piece of electrical equipment can earn.
Frequently Asked Questions
Is a motion sensor work light allowed as the only light control in my garage?
Not by itself in most cases. The NEC requires a wall switch controlled lighting outlet in garages with power. However, an occupancy sensor with a manual override at the switch location can serve that role. See the code summary at EC&M Code Q&A: Lighting Outlet Requirements.
PIR or microwave: which sensor is better for a garage?
For open garages with clear sightlines, passive infrared works well. Microwave or dual technology sensors, by contrast, handle clutter and parked vehicles better but need careful aiming to avoid false triggers. Good comparisons are available from LED Lighting Supply and Leviton’s sensing technology article.
How many lumens do I need for a garage workshop?
Aim for roughly 50 lumens per square foot for general garage areas and up to 300 lumens per square foot over work surfaces. For more detail, see Bob Vila: 10 Ways to Improve Your Garage Lighting.
Why does my motion sensor work light keep turning off while I am working?
Usually, the time delay is too short, or the sensor cannot see you from where you are working. To fix it, lengthen the delay, reposition the sensor, or use manual or vacancy mode at the bench. The DOE Energy Saver guide on lighting controls explains how sensor placement affects coverage.
What color temperature is best for a motion sensor work light?
Around 4,000K to 5,000K works well for most garages and workshops, with 5,000K being the common choice for detail work. See the Instructables Workshop Lighting Tutorial.
Does a motion sensor work light really save energy?
Yes, although results depend heavily on product selection and setup. In fact, DOE field demonstrations found added savings ranging from very large to almost none depending on installation quality. Read the summary at CSE Magazine.
References
- U.S. Department of Energy, Energy Saver. “Lighting Controls.”
- U.S. Department of Energy, Building Technologies Office. “LED Lighting and Occupancy Sensor Controls” (GATEWAY demonstration brief).
- Consulting Specifying Engineer. “Report on Occupancy Sensors Released.”
- EC&M. “Code Q&A: Lighting Outlet Requirements.”
- Electrical Contractor Magazine. “Branch Circuits: Required Lighting Outlets, Part V.”
- Leviton Captain Code. “210.70(A)(2) Lighting Outlet Locations and Limitations” (NEC 2023).
- City of St. Paul, Department of Safety and Inspections. “Electrical Checklist: Garage.”
- Leviton. “Occupancy Sensor Technology: PIR vs. Ultrasonic vs. Microwave vs. Microphonics.”
- LED Lighting Supply. “Microwave vs PIR Motion Sensors: Which Is Better?“
- Ansell Lighting. “Passive Infra Red and Microwave Detection.”
- Bob Vila. “10 Ways to Improve Your Garage Lighting.”
- Instructables. “Workshop Lighting Tutorial.”
- Simple Lighting. “A Complete Guide to PIR and Sensor Garage Lights.”